|
|
Outlook Size Tricks
Procedures to
Reduce Mailbox Size
The following describes several ways to enhance
the performance of your email client and maintain
its storage space on the email server. It applies
to Outlook 98, Outlook 2000/2002 client
configuration.
Special notes are also included for Outlook97,
Exchange Client 5.0, Outlook Express, Eudora Pro
4.0, and Outlook for Mac v.8.x.
Mailbox Management
As your mail
storage grows you will need to manage your mailbox
size. There are a number of things that you can do
to assist in this maintenance. Listed below are
current recommendations to help reduce the storage
space. The reduction of used space can be
accomplished by saving the email attachment(s) to
a file location on a local or networked drive.
Deleting items in various folders in your mailbox
including the Sent Items folder and making
sure that the Deleted Folder is purged or
emptied. Finally you can create a PST
(Personal Folder) file for long-term storage of
your important email messages or else set Outlook
to AutoArchive your mailbox.
Just how big is my
Mailbox?
To determine just how big your Mailbox is:
-
Right click on "Outlook Today -
[Mailbox - Your Name (IC)]"
-
Select "Properties for Outlook
Today"
-
Under the "General" property tab
select "Folder Size"
-
You will then be presented with a
list of sub-folders and their size.
-
Adding size column to message
view:
- Select View menu, Current
View, Customize Current View...
- Select Fields Button,
choose from Available Fields window, add
'size' field
*** For Outlook97 and Outlook for Mac, select
View menu, Show Fields.
*** For Exchange Client 5.0 and Outlook
Express, select View menu, Column.
Save Attachments to
Another Location
To save attachments
to another location follow these guidelines:
-
Clearing/saving
attachments:
-
In the message with
an attachment, right mouse click on the
attachment, choose 'Save As'.
-
Select the location
where the attachment should be saved: local
drive or your home directory.
-
The attachment is
now saved and can be cleared from the message by
selecting the attachment and pressing the
'Delete' key on the keyboard.
-
Select File menu,
Close and click on Yes when prompted "Do you
want to save changes?"
Clean out Sent Items
Folder
Periodically
checking and deleting unwanted messages in your
Sent Items folder will also help the storage space
on the exchange server since deleted sent items
will end up in Deleted Items folder, which will be
attended by manual or AutoArchive mechanism.
Emptying Deleted
Items
Messages in Deleted
Items folder are still counted for in the
Information Store. Prompt purging of unwanted
message in this folder will help alleviate the
space shortage on the server
Note: Deleted items can be undeleted for up to
48 hours after deletion.
To empty (purge)
Deleted Items:
Option A: Select 'Tools' from the menu bar
and "Empty deleted items folder"
-
Exchange Client 5.0,
this option does not apply. Simply right click
on Deleted Items folder and click Empty folder.
-
Mac Outlook v8.1,
this option does not apply.
-
Outlook Express,
select Edit menu and select Purge Deleted
Messages.
-
Eudora Pro 4.0, 1)
highlight the items to be purged, 2) select
Delete from Message menu, 3) select Remove
deleted messages from Message menu.
-
Netscape
Communicator 4.5, emptying Trash folder has no
effect on the Deleted Items folder, i.e. deleted
items remain intact on the mail server.
-
Note: In Microsoft
Outlook 98, clicking "Empty 'Deleted Items'
Folder" on the Tools menu does not empty all
Deleted Items folders. This menu command
empties only the Deleted Items folder on the
primary store. Deleted Items folders on other
personal stores are not affected.
-
RESOLUTION: To
empty other Deleted Item folders, using the
right mouse button, click the folder name, and
then click "Empty 'Deleted Items' Folder" on
the shortcut menu.
Option B:
Right-click on Deleted Items and click on Empty
"Deleted Items" Folder.
Create a PST file
To manage your email
in a more efficient manner it recommended that you
create a PST file on either your local hard drive
or networked “home drive”. The creation of a PST
will allow saving your mail long term and
maintaining a small store on the server.
Windows Outlook Clients:
-
In Outlook, go to
Tools / Services
-
If there is no
Personal Folders choice in the Services, click
the Add… button and double-click on the Personal
Folders option. If the Personal Folders choice
is already in the Services window, double click
it.
-
Create a new file by
selecting the Add… button.
-
A dialog box
“Create\Open Personal Folder” will come up and
ask you name the PST file and you will be able
to select the location of where the file will
reside on the network or local hard drive.
-
Name it whatever you
want and place it in your desired location.
-
Choose level of
encryption desired and if you want to have a
password to open the file.
Note: The password associated with your
Personal Folder is completely separate from your
login password. If you lose your Personal Folder
password, there will be no way to get into your
Personal Folder.
-
Close out of the
dialog boxes.
-
You should now see
your Personal Folders in your folder list view.
Macintosh Outlook
Client 8.x:
-
Navigate to Tools /
Services
-
If there is no
Personal Folders choice in the Services, click
the Add… button and double-click on the Personal
Folders option. If the Personal Folders choice
is already in the Services window, double click
it.
-
Create a new file by
selecting the New… button.
-
Name it whatever you
want.
-
Choose level of
encryption desired and if you want to have a
password to open the file.
Note: The password associated with your
Personal Folder is completely separate from your
login password. If you lose your Personal Folder
password, there will be no way to get into your
Personal Folder.
-
Close out of dialog
boxes
-
You should now see
your Personal Folders in your folder list view.
To compact PST
or OST files on local machines:
-
To conserve space on
your computer's hard disk, you can delete
unwanted items from the various PST and/or OST
folders and then compact the files to make them
smaller.
-
NOTE: Deleting the
unwanted items from each folder only moves them
to the Deleted Items folder, but not from the
mailbox itself. You must delete the items from
the Deleted Items folder to permanently delete
them, so that Outlook can compact the file.
-
The compacting
process does not remove all the free space from
the file.
-
It leaves either 16
kilobytes (KB) or 4 percent of the file size
(before compacting) whichever is greater.
-
To be compacted, a
file must meet the following requirements:
Personal folder
compaction may be initiated either manually or it
will happen automatically. Automatic compaction
takes place as an idle task in the background
while Outlook is running. In some cases the PST
files stored on a file server may require manual
compaction, due to interactions between the file
server where the PST files are stored and your
computer.
To Manually Start PST Compaction (this also
applies to Outlook97, Exchange Client 5.0, and
Outlook for Mac):
- On the Tools
menu, click Services.
- Click to select
Personal Folders, and then click Properties.
- On the General
tab, click Compact Now.
- Click OK twice.
To Manually Start OST Compaction (this also
applies to Outlook97, Exchange Client 5.0, and
Outlook for Mac):
- On the Tools
menu, click Services.
- Click to select
Microsoft Exchange Server, and click Properties.
- On the Advanced
tab, click "Offline Folder File Settings."
- Click Compact
Now.
- Click OK three
times.
Auto Archiving
Note: This
does not apply to Exchange Client 5.0, Outlook
Express, Outlook for Mac, or Eudora Pro 4.0.
Your Outlook mailbox grows as items are created in
the same way that papers pile up on your desk. In
the paper-based world, you can occasionally
shuffle through your documents and store those
that are important but not frequently used.
Documents that are less important, such as
newspapers and magazines, you can discard based on
their age.
You can quickly complete the same process in
Outlook. You can manually transfer old items to a
storage file by clicking Archive on the File menu,
or you can have old items automatically
transferred by using AutoArchive. Items are
considered old when they reach the age you
specify. With AutoArchive, you can either delete
or move old items. Outlook can archive all types
of items, but it can only locate files that are
stored in a e-mail folder, such as a Microsoft
Excel spreadsheet or Word document attached to an
e-mail message. A file that is not stored in a
e-mail folder cannot be archived.
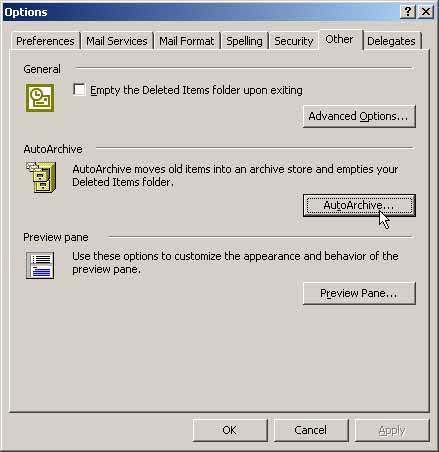
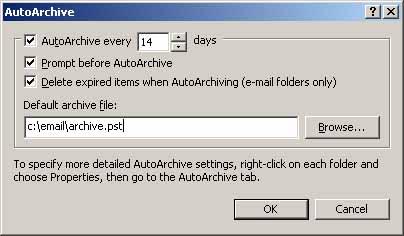
AutoArchive is a two-step process:
- First, you turn
on AutoArchive. On the Tools menu, click
Options, click the Other tab, and then click
AutoArchive.
*** For Outlook97, click AutoArchive tab instead
of Other tab.
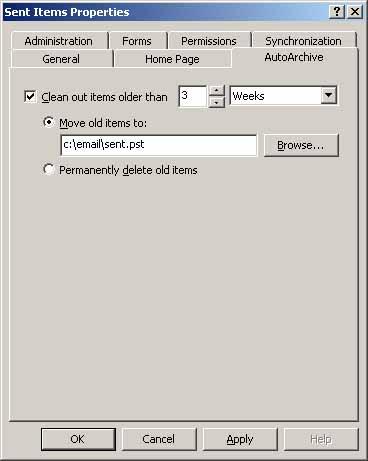
- Second, you set
the AutoArchive properties for each folder that
you want archived. At the folder level, you can
determine which items are archived, and how
often they are archived. You can automatically
archive individual folders, groups of folders,
or all Outlook folders. The process runs
automatically while Outlook is running. The
AutoArchive properties of each folder are
checked by date, and old items are moved to your
archive file. Items in the Deleted Items folder
are deleted.
Several Outlook
folders are set up with AutoArchive turned on.
These folders and their default aging periods are
Calendar (6 months), Tasks (6 months), Journal (6
months), Sent Items (2 months), and Deleted Items
(2 months). Inbox, Notes, Contacts, and Drafts do
not have AutoArchive activated automatically.
There is a difference between exporting and
archiving. When you archive, the original
items are copied to the archive file, and then
removed from the current folder. When you export,
the original items are copied to the export file,
but are not removed from the current folder. In
addition, you can only archive one file type, a
personal folder file, but you can export many file
types.
When you archive, your existing folder structure
is maintained in your new archive file. If there
is a parent folder above the folder you chose to
archive, the parent folder is created in the
archive file, but items within the parent folder
are not archived. In this way, an identical folder
structure exists between the archive file and your
mailbox. Folders are left in place after being
archived, even if they are empty.
|
|
|
|
   
|
|
|